Showing posts with label Valentine. Show all posts

Sunday, January 21, 2018

Starting The New Year Right.

(Click on any photo to view a larger image.)

"Precious Metals"
Our crafty mavens at the Dorchester Senior Citizens Center have started 2018 with a couple of cards that highlight the gleaming sheen of metal.

"Precious Metals" features metallic card stock in gold, silver and copper colors. The silver cardstock, in particular, looks like vintage pressed tin when it is embossed.
The tiniest bit of black card stock peeks out from under the embossed pieces to offer a bit of contrast to the creamy white base card layer.

These crafters love their "LoveBirds" card.
Our second card takes a look ahead to one of the many minor holidays that occur during the month of February. This love themed card comes just ahead of Valentine's Day on February 14th but the color scheme makes it a perfect choice for a wedding or anniversary card. The silhouetted love birds on a branch and the sentiment "Always and Forever" undeniably make this card one for lovers. Like the previous card, this one also features silver card stock with just a touch of gold and some sparkling rhinestones for accent. Not shown is the inside card liner which also has subtle silver and gold accents.

I made an large poster-sized version of this card in traditional Valentine's Day colors to use as part of the senior center decorations. Here they are, side by side, so you can see the size difference.

Also on the calendar for February are Mardi Gras on February 13th and Chinese New Year on February 16, not to mention President's Day on February 19. It's going to be a busy month.


Life is a creative process.

- Gitana, the Creative Diva

Sunday, February 19, 2017

Oh, The Things We've Done...

Follow my blog with Bloglovin
(Click on any photo to view a larger image.)

I'm bewildered by the speed at which life is moving nowadays. Seems yesterday I was talking about the Lunar New Year. Now Valentine's Day has come and gone and President's Day is a day away. I'd better get moving before Christmas sneaks up on me again.

We've done a number of projects at the Dorchester Senior Citizens Center, some guided and others self-directed. I've been moving towards providing materials and some direction and having the members express their own creativity. This approach seems to be working quite well and the ladies are loving it.

I conducted a class in the art of masking to create a simple scene through the use of inks, cosmetic sponges and rubber stamps. I created a few samples of the scene using different color combinations from the limited palette we have to work with, then demonstrated how the scene was created. Then I tasked them with creating their scenes and, true to form, they came up with interpretations I never would have imagined. The scene was then used as a focal point in a minimalistic card.

For Valentine's Day, we did a project I call The Queen of Hearts. The ladies were told to decorate a foam crown to express love, then I set them loose on a table loaded down with stickers, glittered foam, self-stick rhinestones and all manner of bling. My seniors, magpies all, love all that shiny stuff and they had a ball decorating their crowns. They were then displayed on the center's walls as part of the Valentine's Day decorations.

There was also a swing card class, also known as the flip flop card, so named because it is cut in such a way that a central panel swings around upon opening the card to reveal what is on the back. You can be sure you won't find that at a Hallmark store.

Our latest project was the one we all enjoyed the most. I cut a memory wire bracelet apart to create individual rings that were used to make beaded key rings that can be worn on the wrist like a bracelet. After years of collecting beads, I had literally thousand of beads at my disposal, at least half of which I placed on the table for them to use. The sight of all those beads must have made their creative juices flow because they dove into the project like excited school children. They liked it enough to make two rings each, many of which were intended for grandchildren, nieces and nephews. This was one of the biggest classes to date, so much so that a couple of late comers had no place to sit at the table and had to walk away, sad to miss out on the fun. You can tell from the smiles on their faces that they really enjoyed themselves.

The best part of this class came at the end. After I took their picture, I announced that my birthday was coming up and I wanted a birthday hug from my "girls". Well, they gave a communal yell of approval and lined up as if I was a visiting rock star. Every one of them gave me the warmest, most sincere smiles, hugs and kisses as they filed by, one at a time. By the last embrace I was almost in tears, so full was I of gratitude and joy at being in the company of such wonderful people.

If I'm being honest with myself, I run this class as much for my enjoyment as for theirs. If I'm really being honest, I probably enjoy it more.

Ballo ergo sum
- Gitana, the Creative Diva

Tuesday, February 14, 2017

Something To Pass the Time...

(Click on any photo to view a larger image.)

In the midst of running a household, preparing and conducting a weekly crafts class for senior citizens and ferrying my elderly parents to a variety of medical appointments, there is very little time for me to do that which fulfills me in a personal way. Yes, the senior crafting is wonderfully gratifying but I am keenly aware that I do that primarily for them, not for me. So every once in a while I have to take a step back and do something to satisfy my inner creative beast.

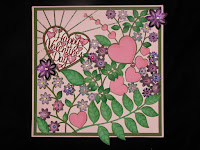
Recently, I came across some new cutting files by one of my favorite artists, Monica Bjork. She creates the most intricate cutting patterns for paper crafters. The best part is her files are free! She gives them away to anyone who wants them. In checking out her newest files, I found this wonderfully detailed file in her Lattice Files category. One look told me I wanted to use this file as the basis for a Valentine's wall poster. Here you can see the before and after photos of my endeavor. I was very pleased with the way it came out. None of the elements were mounted on foam tape to make them stand out. I used ink shading and manipulation of the paper to make them pop off the page and appear three dimensional. The finished size is 12" x 12".

Once I scratched my creative itch, I gave it away to my sister to hang in her office along with the bulletin board header I made for her last year. Now I want to make an even bigger version with more details. Next year, perhaps...


Ballo ergo sum
- Gitana, the Creative Diva

Wednesday, February 1, 2012

An Unconventional Valentine's Day Card

(Click on the picture to view a large image.)
2012 - a dramatically different color scheme
When you think of Valentine's Day, you think of pink and red hearts, right? Yeah, me too, but this year I wanted to do something a little different for my seniors. Our Valentine's Day projects for the past two years, as seen below, have included the mandatory red and pink hearts. This time I wanted to give an unexpected twist to our craft project. While this year's card sports the obligatory hearts and flowers my ladies know and love, the color scheme is anything but conventional. Inspired by a beautiful piece of specialty paper in shades of turquoise and purple , I designed a card that really played up those colors. I will admit that, at first, I wasn't too thrilled with the way this card was turning out but the more I worked on it, the more it grew on me and now I'm very pleased with the final outcome.

Our very first project from 2010
2011's hanging ornament
The colors are not the only things different about this card. You can't really tell from the photo but this is not a foldover card, it's an insertion card. What I mean is that there is only a front and a back to this card, like a postcard. It doesn't open up. You have to turn it around to see what is written on the other side. This will be a bit of a departure for these ladies accustomed to the more conventional type of card.

For this project I had my DrawPlus graphic software and my eCraft electronic cutter working overtime. The heart is crafted of four different layers stacked upon one another. Each of these layers had to be designed and cut separately. It took quite a few attempts to get the lighter blue trellis-like layer to cut correctly, after which I had to manually poke out all the little holes in between the mesh. Once the heart was completed, cutting the rest of the card elements was a piece of cake. The tiny tag was just the perfect size for a kiss print rubber stamp that I've had for the longest time. I deliberately left off any overt references to Valentine's Day because I wanted this project to convey the universal aspect of love over the celebration of one calendar day. This card could just as easily be used to congratulate a newly engaged couple or be sent as a quick hello to a cherished grandchild. Although I admit that the swirls and flowers lend a very feminine air, the color scheme would suit a young man. I'm sure the ladies will love it.

Ballo ergo sum
- Gitana, the Creative Diva

Wednesday, February 3, 2010

Valentine Volunteerism

(Click on the image for a larger view.)


Last week in my personal blog, I mentioned that I would be volunteering to teach crafts at a senior citizens center. (Click here to read that post.) This is the card I've created as my first project with the seniors. Because I will be dealing with people who have dexterity and visual limitations, I have to limit the amount of detail work they have to do to complete my projects. For this card I have cut out and prepared all the pieces into a kit so all they will have to do is assemble the finished card. This should go pretty quickly. Here are the instructions if you would like to try your hand at creating this card. Good luck.

Valentine Love Card
This bold black card creates a striking and unconventional backdrop for the traditional reds and pinks of Valentine’s Day. This project uses a 6.5” X 5” card and matching envelope but any similarly sized card can be used. The proportions of the decorative elements can be varied to fit the size of the base card. Heart shaped paper doily is purchased. Large heart is cut by hand to fit inside the edges of the doily. Plain oval, scalloped oval and tiny hearts are cut with a die punch. White paper pieces are cut by hand.

Materials List:
1. One black base card and envelope
2. One heart shaped paper doily – 3 ¾ ” x 4”
3. One large red patterned heart in a size to fit the doily – 3 ¼” x 3 ½”
4. One white oval with stamped sentiment – 3” x 2 ¼”
5. One red patterned scalloped oval sized to fit white oval – 3 ¼” x 2 ½”
6. 4” x 5” piece of paper for inside of card.
7. Nine tiny die punched hearts in assorted red and pink patterns
8. White paper strip – 5” x ¼”
9. Glue stick
10. Coloring Pencils or other coloring medium (markers, crayons, etc.)
11. Black marker
12. Tweezers
13. Foam Tape (also called dimensional tape)

Construction: Card
1. Using black marker, carefully edge the large heart and the white oval.
2. Using glue stick, glue red patterned heart in the center of the paper doily. Glue the completed heart on the left side of the card front.
3. Color the sentiment in the white oval then glue it in the center of the scalloped oval.
4. Take two pieces of foam tape and tape them to the back of the ovals. Remove the protective paper from the tape and adhere the ovals in the lower right corner of the card front slightly overlapping the bottom edge of the heart. Because the tape is thick, it raises the ovals off the surface of the card creating dimension.
5. Place the 4 x 5 piece of white paper inside the card to determine placement. Once determined, run glue stick around the edges and glue into place.

Construction: Envelope
1. On the front of the envelope, glue white paper strip about one inch from the left edge.
2. On either side of the strip, alternate seven of the tiny hearts, spacing them evenly and angling them slightly away from the strip. A tweezer can be very helpful in handling these small items.
3. (Not visible in photo) Turn the envelope around. On the center of the lower edge of the envelope flap, place the remaining two hearts, slightly overlapping and angling them for interest.

Ta-daaah! Your card is done!


Ballo ergo sum
- Gitana, the Creative Diva