Saturday, January 29, 2011

Baby Bananas

(Click on any photo for a larger image.)

Recently I attended a baby shower to welcome the newest member of our family, a beautiful baby boy born to my second cousin, Melissa. For her baby registry she had chosen all the sheets, clothes and accessories in a Jungle Babies pattern featuring tiny jungle animals. In keeping with this theme I created this banana tree scene in which to wrap the baby gifts my sister and I had purchased.

The bananas contain the baby clothes. Each individual piece of clothing was folded and rolled up jellyroll style with a floral wire in the middle. Then it was rolled up in tissue paper, the ends secured and several of them tied together to resemble a bunch of bananas. The three dimensional tree is built on a brown paper-wrapped box that contains another gift. The ends and sides of the fruit crate were covered with personalized labels I designed in a drawing program. The little monkey was inspired by the monkeys on the clothing, What you can't see is what's inside the crate hiding under the paper grass...baby hangers to hold all the clothes! The monkey, the bananas in the bunch hanging from the tree, and the leaves on the tree were all created in a drawing program, saved as .svg graphic files and cut with the eCraft electronic cutter.

If you are interested in how I created the "baby bananas", just drop me an email and I'll send you instructions. (Note: Instructions are for the tissue wrapped bananas only. The tree, monkey, etc. are not included.)

Thanks for stopping by.


Ballo ergo sum
- Gitana, the Creative Diva
Design team member for About Art Accents

...and Jill came tumbling after.

(Warning! Graphic image.)

Something happened to me on Sunday night, 1/23/11, that although it occurred frequently during my younger years, it hasn't happened to me in a long, long time. I fell down a flight of stairs. The basement stairs, to be precise. It all  happened so quickly it was like a blur. One moment I was at the top of the stairs speaking to my husband then the other I was at the bottom of the stairs, having slid down its entire length on my left leg. I remember turning away from my husband as we finished our conversation. He closed the door at the top of the stairs and was heading for the living room. I turned to descend to my basement work room, and that's all I can clearly remember other than the sound of thump-thump-thump-thump as my body collided with the edge of every step from the top to the bottom. Oh yeah, and there was also the sound of me yelling on the way down.

I was fortunate on a number of counts. 1) My husband was still close enough that he heard the whole thing and was able to help me up immediately after the fall, and 2) I didn't hit any bones on the way down else I surely would have broken something. This was one time I was grateful for the extra junk I have in my trunk because it cushioned what could have been a disaster. The pain was immediate and very short lived although the bruising...well, let's just say if bruising was an Olympic sport I would have made it to the podium. The image you see here is what it looks like 5 days after the accident. It's already beginning to heal as evidenced by the areas of angry red surrounded by dark purple. It took a full 24 hours for the  bruising to fully bloom. I'll be seeing a doctor soon and will have myself looked over thoroughly to make sure nothing else is going on inside that needs medical attention.

In spite of it all I've been smiling like a champ. Why? Because I recognize just how lucky I was not to have been seriously injured. Because I feel as if I have just dodged a bullet. Because I know that no matter how bad this bruise looks, in time it will heal and I will be fine.In the past few weeks I have had the sad task of visiting an old friend in hospice. Her days are nearing their end. Compared to her I am the picture of health. So with that in mind I'll take the bruises, I'll learn the lessons and I'll be thankful for every single day I have on this earth.

Life is short. Live it.


Ballo ergo sum
- Gitana, the Creative Diva
Design team member for About Art Accents

Tuesday, December 28, 2010

Last Minute Christmas Cards

(Click on any photo for a larger image.)

Ok, I admit it. I didn't send Christmas cards this year. Heck, I barely bought any gifts. There was just too much going on for me to sit down long enough to create my annual masterpiece to send out to everyone. To be very honest I felt a bit empty and let down about it because I really wanted to craft cards but Time is a hard task master and refused to relent in my favor.

The wee hours of Christmas morning found me feverishly throwing together some cards for the few people for whom I actually bought gifts. After all, if the card IS the gift, it should be a bit more personal than your standard store bought fare. Thank goodness for my RTU stash. It really comes through for me in a pinch. RTU stands for Ready To Use. It is the repository of all the unused bits and pieces of other projects as well as where I put the result of
any of my crafting experiments. Whenever I'm in a mad rush to throw together a card and I don't have time for my usual creative dawdling, my RTU's save my day.

The cards on this page represent all the cards I made early (like between 2AM and 6 AM early) on Christmas morning. With the exception of the curly purple tree on the top card and the hand drawn holly border on the white card to the left all of the elements used here were found in my RTU stash. A gilded border here, a rhinestone there and VOILA!, a card is born. Granted, the creativity quotient may have been somewhat lower than what I would have liked but it was preferable to a store bought card or (horrors) no card at all. Next year I'll have to start my cards earlier. Yeah, that sounds like a plan.

Ballo ergo sum
- Gitana, the Creative Diva

Sunday, November 28, 2010

An eCraft Project

(click on photo for a larger image)

Craftwell recently released its updated software designed to correct many of the problems inherent in the original version. I'm happy to report that many of the problems I had with my machine have been addressed and corrected with version 2. It's still not not my dream machine but it is far from the nightmare it was when I first received it. As a result, I've been playing around with it quite a bit, putting it through its paces and seeing what it can do. My big interest in this machine is the ability to import and cut images that I design on my computer. Now that it is behaving in a more consistent manner I can begin to dream up projects for the senior citizens center that I can cut solely on the eCraft. Here is my first paper project cut solely on the eCraft. It is a layered flower mounted on a pin back badge.

The flower on the right was cut from standard cardstock using the eCraft Fundamentals 1 set of SD images that were included in the initial shipment of the machine. The poinsettia flower on the left was cut from discontinued fabric paper the center had on hand with .svg files that I adapted from royalty free clipart. The layers are stacked with a washer between the leaves and petals to create height. The individual leaves and petals are curled and manipulated to give them more dimension and depth. Each layer, including the base badge, has a small hole punched in the middle through which passes a small office variety paper fastener. The legs of the fastener are opened and pressed tightly to the pin-back, effectively holding the whole thing together. I'm particularly pleased that I was able to salvage and repurpose the badges from being tossed into the trash by the senior center director. I believe wholeheartedly in recycling.These versatile flowers can also be made without the pin back for use as decor or dressing up a gift package. Ooh, I see a flowery spring bulletin board in my future.


Ballo ergo sum
- Gitana, the Creative Diva
Design team member for About Art Accents

Sunday, November 14, 2010

The eCraft arrives...with a slew of problems.

The eCraft electronic cutter that I won at the CHA Summer 2010 Super Show finally arrived at the very end of October just as I was leaving for my 24th anniversary weekend so I wasn't able to put it through its paces until after I returned.

The machine comes with a power cord, a USB cord for connecting to a computer, a proprietary SD card with a set of images, a paper tray and a roller assembly to accommodate rolls of paper for creating banners. For more information on the eCraft's features and capabilites, visit the Craftwell USA website.


To be honest, I think this machine has been putting me through my paces and trying my patience in the bargain. The downloadable software that allows the machine to communicate with my computer and cut my own .svg images is buggy...VERY buggy. To say that there are a few glitches is to be kind. Craftwell, the makers of the eCraft, are well aware of the issues and is scheduled to release an update to the software on November 19th. (The original release date was Nov. 12, pushed back at the 11th hour.) I was so annoyed and frustrated by the problems I was encountering that, after three days and untold sheets of cardstock, I disassembled it and put it back in the box, fully prepared to relegate it to the status of expensive paperweight. By way of the eCraft Facebook page as well as a user-created Yahoo group that I have joined, I have discovered that not only am I not alone in my frustration but I am not experiencing the worst of it. Many other users are experiencing worse problems with the machine and its software.Non-communication between computer and cutter, windows asking for drivers that have already been installed, ripping, tearing and shredding paper...all sorts of problems are being reported. Yet others are reporting perfect cuts and wonderful results. Apparently there are those who have been unduly blessed by the electronic crafting angels. I, however, am not among them.

After a couple of days, I took it back out of the box and began again from scratch, uninstalling and reinstalling the software and rebooting my computer a number of times before it and the eCraft were able to communicate. My euphoria at this progress was short-lived because of the glitches inherent in the software. It performs well enough when cutting directly from the images provided on the SD card but PC-to-eCraft communications remain somewhat sketchy. Still, I was able to successfully create and cut some of my own images, albeit extremely simple ones. Anything complex and eCraft has a hissy fit, cutting random circles, stuttering in one place and likewise exhibiting ill-tempered behavior.

In spite of it all, I was able to cut one perfect project and created my son's name for his wall. All the layers of this image were created in a drawing program, saved in .svg format, imported into the eCraft software and sent to cut. I stamped the topmost layer with Versamark watermark ink and dusted it with PearlEx pigments.

In the course of my travails with the machine, I think I may have stumbled across the reason for the stuttering while cutting imported image files. I have posted my theory on my Facebook fan page under the discussions tab (click here if you're interested) and am waiting to hear if anyone else tests my hypothesis. In the meantime I, like dozens of other eCraft owners, am a lady-in-waiting...waiting for the promised update that is supposed to address all software issues known to date. I've got projects in the pipeline waiting to be cut so this update better be all it's cracked up to be. I'll keep you posted.


Ballo ergo sum - Gitana, the Creative Diva Design team member for About Art Accents

Monday, November 1, 2010

Trying to Catch Up

Wedding card
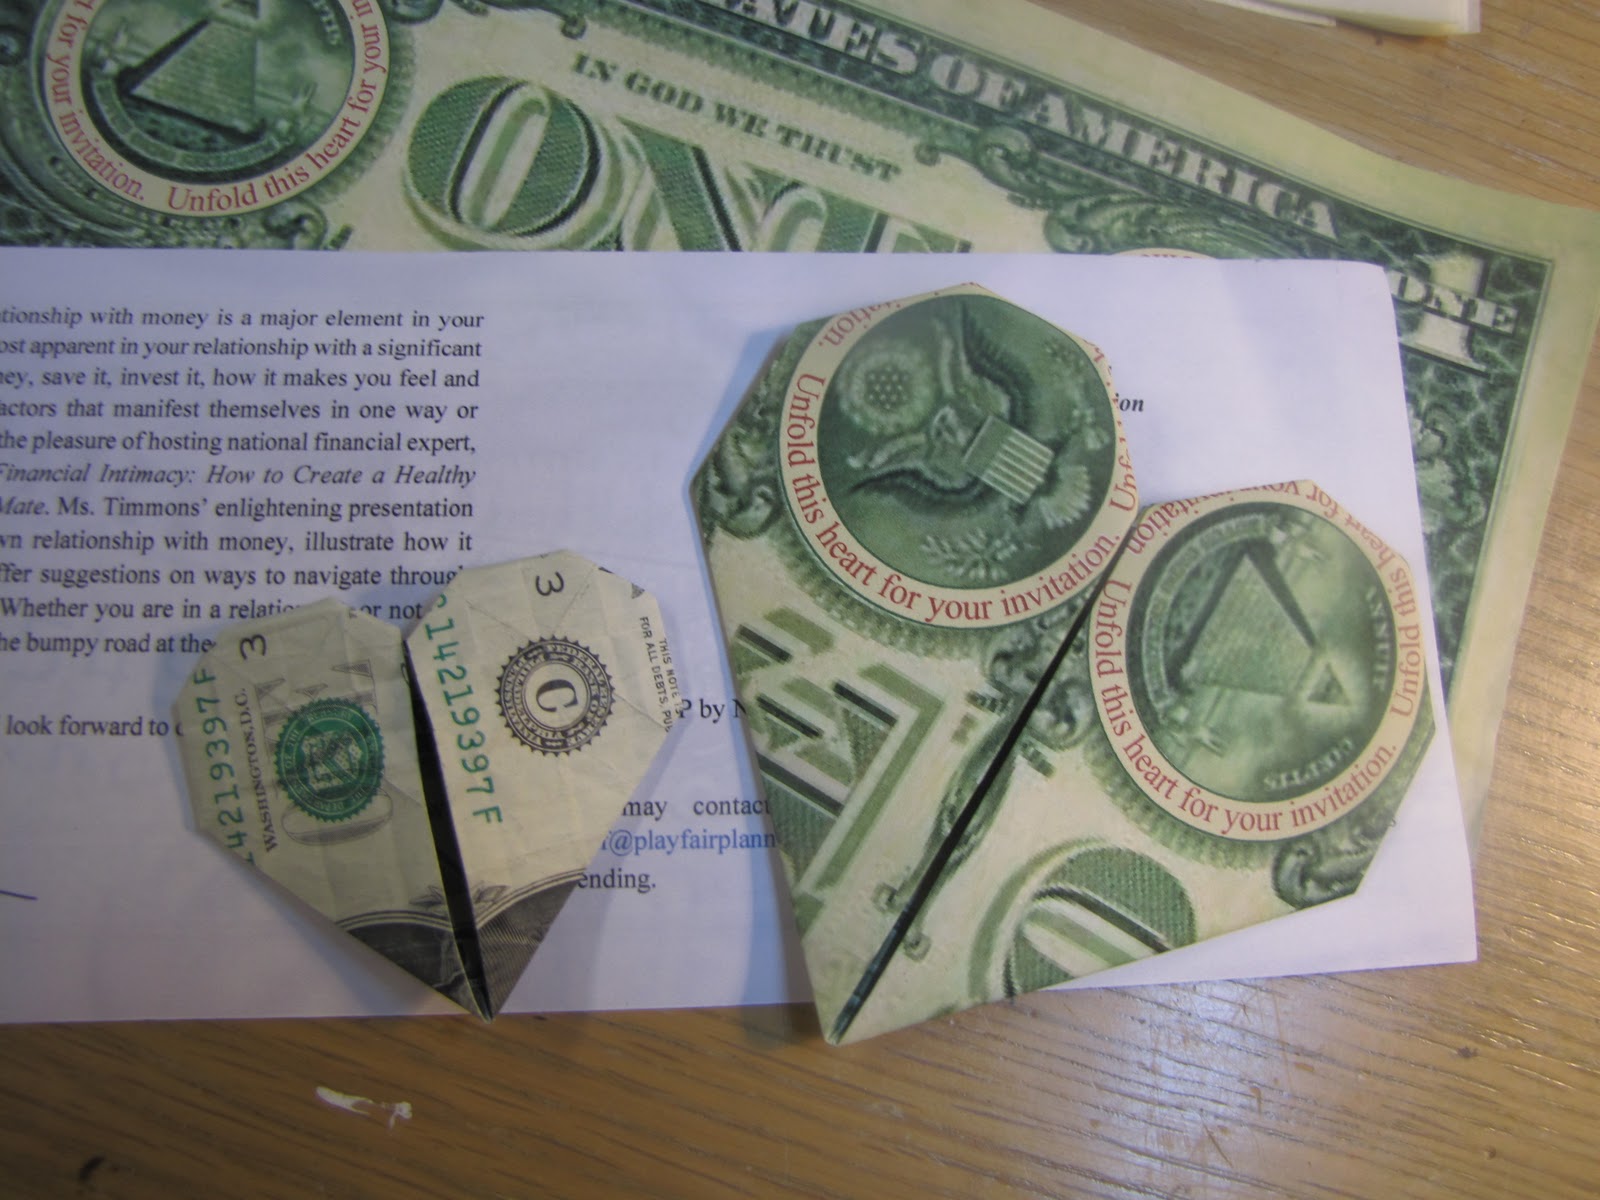
Origami folded invitation


Shrink Plastic Charm Bracelet

Cardmaking at the Senior Center

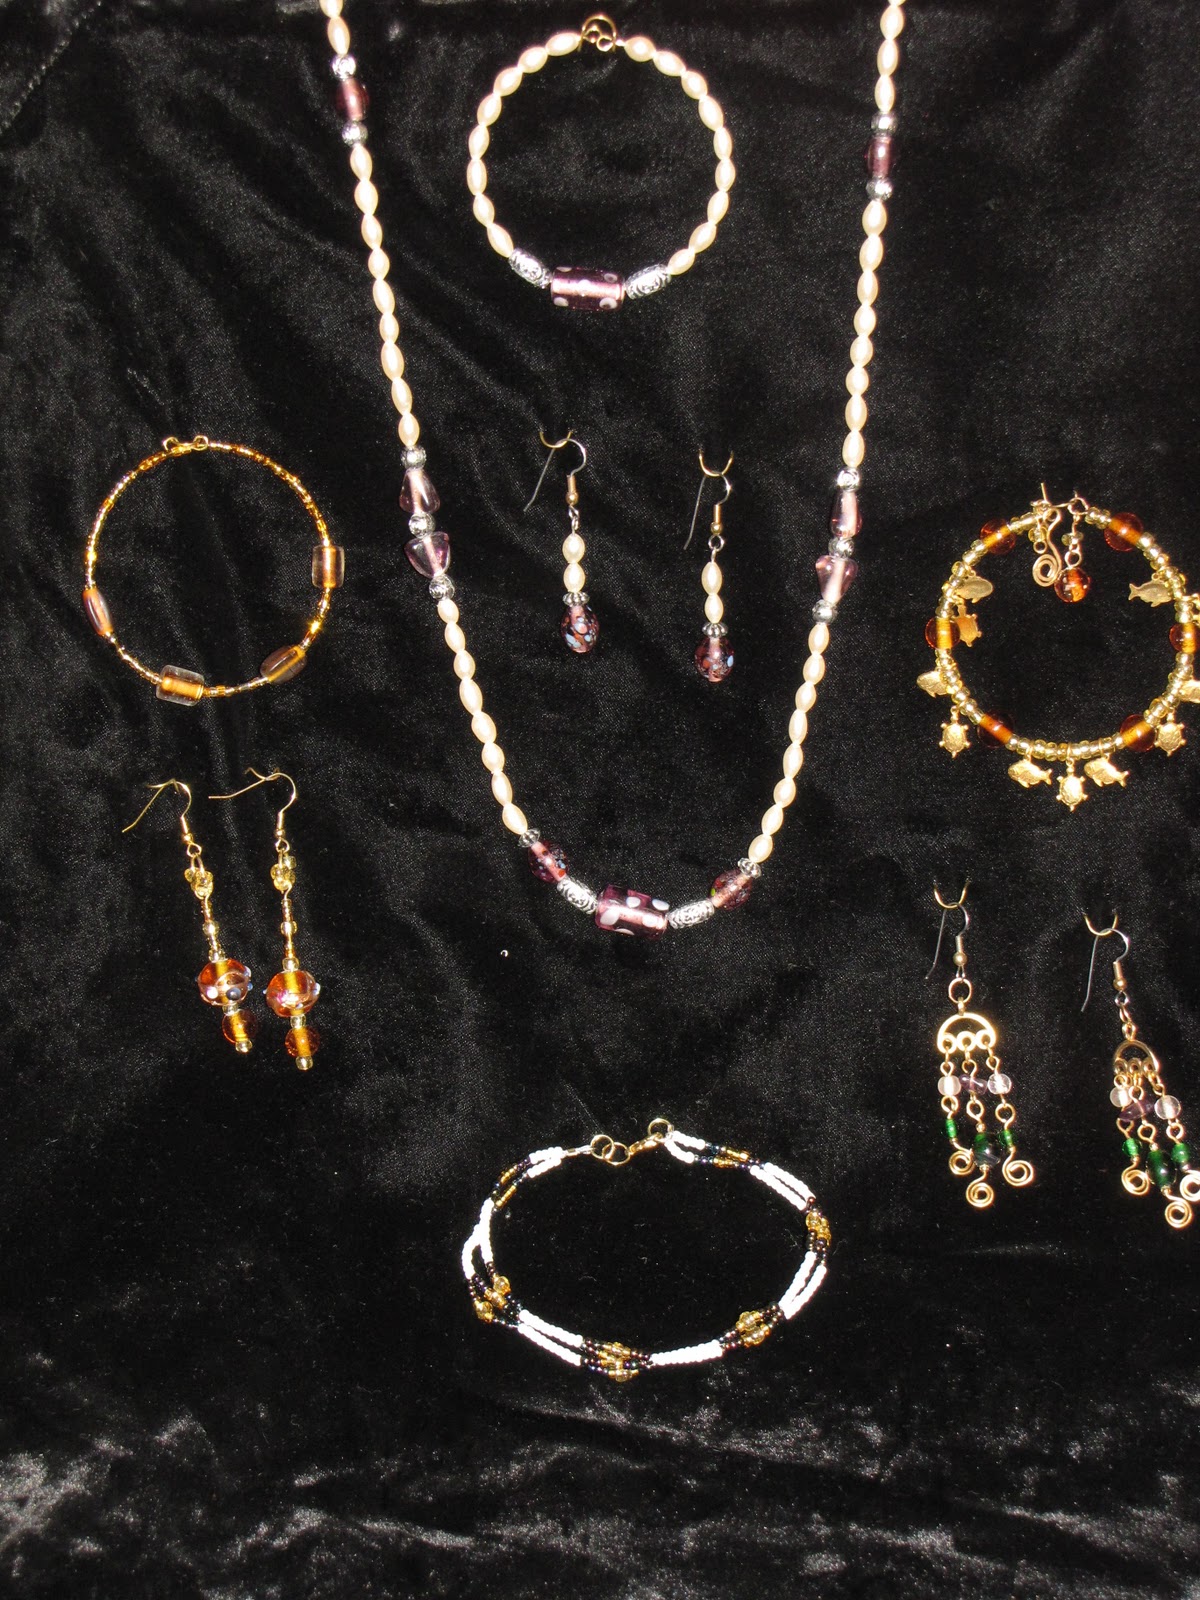
Jewelry making

I've been so busy lately it feels as if I've been running like a madwoman just to stay in place. Just in the past month alone I worked on the projects pictured on this page.

I designed, printed and folded over 100 custom invitations for a repeat client. The invite, which had to tie into the theme of love and money, is that of an oversized one dollar bill folded origami-style into the shape of a heart. In the photo, I placed the invitation next to an actual folded dollar bill so you can get an idea of the scale.

No sooner was that project completed than I had to scramble to make a card for a wedding I was attending and, of course, I did it just hours before I left for the wedding. No pressure. On the heels of that, I had to create, photograph and write instructions for a charm bracelet made with shrink plastic charms that I rubberstamped and colored. Once that was put to bed, I had to design a card, create the prototype and make individual assembly kits for my crafting class at the senior citizen's center where I volunteer. I had been away from the center for five months due to other commitments and have just returned to find that nearly all the crafting materials had been rearranged. I predict hours of reorganization in my immediate future. On top of all this, I signed up with my sister to attend a weekly jewelry making class at the local community college. I'm having a lot of fun creating simple little bracelets, earrings and necklaces. I have already designed a project for my senior ladies to do. It's the bracelet and matching earrings in the center top of the photo.

As if I didn't have enough to do, I just received a new "toy". The E-Craft electronic cutter that I won in a contest at the CHA SuperShow this summer finally arrived after numerous delays. I've been too busy to do much more than open the box. It is two feet long and so much more intimidating on my table that it was at the trade show booth. I'm going to have to dive in soon and put it through its paces so I can really start creating.

My summer flew by, autumn is in full swing, the holiday season is bearing down on me and I'm still hoping to find a little time to relax. Nope, doesn't look like that's going to happen any time soon. Maybe in my next life...


Ballo ergo sum
- Gitana, the Creative Diva
Design team member for About Art Accents

Thursday, September 16, 2010

Well, What a Surprise!

(Click on the photo to view a larger image.)

I have, on many occasions, mentioned the Dorchester Senior Citizen's Center, the place at which I volunteer. Due to many other conflicting commitments, I have been on hiatus from the center since the end of May 2010 and am due to return this month. In my absence, the center director, Ms. JoAnne Biswakarma, updated her center's blog and among her posts what should I find but a photo of myself standing before a display of the projects I did with the center's members. What a surprise!

Click here to go to the post featuring me. Click here to read about all the events that have taken place at Dorchester Senior Citizen's Center.


Ballo ergo sum

- Gitana, the Creative Diva
Design team member for About Art Accents

Friday, September 10, 2010

Saved from the Recycling Bin

(Click on any photo to view a larger image.)
Candleholder - before
Candleholder - after

I've been having such a good time playing with my CHA goodies that I decided to try my hand at something that wasn't made of paper.


My philosophy is that if something is so bad that it can be thrown out, it can't be made any worse by an attempt to fix it and perhaps might actually turn out well. I have a very old candle holder that was so rusted and peeling that it should have been trashed but I like it so much I tried to rescue it with some paint and some of the templates I received from The Crafter's Workshop. (Thanks again to Jaime Echt. What a sweetheart.)

After cleaning and removing the rust, I sprayed it with flat black high temperature paint, the type used for barbecue grills. Then I tried my hand at painting it with some acrylics that are suitable for permanent outdoor use. 


In the process I discovered that some of the problems I was encountering had nothing to do with the stencil or the paint but with the application. Apparently what you apply the paint with and how you apply the paint is as important as the paint itself. After trying a variety of tools I found that a sponge, a dauber or a small stipple brush work well IF the paint is applied thinly and the applicator is nearly dry. Paint that was too wet or too thick tended to seep under the template. As you can see in the second photo, I had to cut the template to accommodate the odd surfaces of the candle holder. The final product is okay for a first attempt. It won't win any prizes but I like it enough to keep it.
Some of the materials used.


Ballo ergo sum
- Gitana, the Creative Diva
Design team member for About Art Accents

Creating with My CHA goodies

(Click on a photo to view a larger image.)


Stencils by The Crafter's Workshop
Moon Gate to Mt. Fuji
In my previous post I showed you a small fraction of the enviable stash of goodies I brought home from the CHA Summer 2010 Supershow in Illinois. In this post you can see some of the things I've done with these materials.

Not to be confined to my favored pastime of creating cards, I decided to try my hand at decorating a pair of paper slippers. These slippers were from a diagnostic procedure my daughter underwent recently and she had kept them because she thought they were "cool". Since she is now away at college, I thought I would jazz them up and send them to her for a giggle. Her area of interest is Marine Biology and she loves all things fish-related so the choice of angelfish was a no brainer. Stencils for all the designs were provided by The Crafter's Workshop. Dye inks, fine point black marker and gel pens were used to color and doodle the design.
"Night Flight" Series -Dragonflies
"Night Flight" Series - Bird

Also from The Crafter's Workshop is the patterned paper used in the "Night Flight" series of cards. The paper is from their Enchanted Complements line and features a softly muted text pattern that appears over a barely discernible pattern of fern leaves done in various tones of one color. These cards were done with Moonlight Aqua and Moonlight Lime. The foliage and flying creatures on each card were stamped in Versafine fast drying black pigment ink, a gift to me by the Tsukineko booth at CHA. Versafine claims that it captures details like no other ink and I'm happy to say this superior ink has lived up to its claim. My images were crisp and dark with no muddiness around the edges. These cards were all created using pigment inks, a departure from the dye inks I have been using of late. I was reminded of the creamier texture and slower drying properties of pigment inks, allowing themselves to be moved around by the artist, creating smoother transitions between colors. I took full advantage of this characteristic when creating the ombre background. A fine tip black marker was used to darken the winged creature silhouettes for added emphasis and a white gel pen was used to add highlights.

The green base card for Moon Gate Path to Mt. Fuji was a gift from the folks at the DCWV (Die Cuts With a View) booth at CHA. This particular card comes from their new Street Lace Collection. The main image is from About Art Accents (plate A246) and was colored using a combination of coloring pencils and markers. The shimmering branch to the right of the main image is "Bonsai Sprig" by Stampendous, stamped in Versamark Ink, also a gift from Tsukineko, and dusted with PearlEx pigment powder, a gift from A.C. Moore as part of my sweepstakes prize.


Ballo ergo sum
- Gitana, the Creative Diva
Design team member for About Art Accents

CHA Convention Swag

A fraction of my "swag" haul.
DCWV designer series cards
The Crafter's Workshop papers and stencils
Cutting tools from Fiskars.
Chalks and rub-on colors by Craf-T.
A bonanza from Tsukineko


Never having been to a crafts convention before, I had no idea what to expect in spite of the fact that I had done quite a bit of reading about CHA before I went. Although I had been warned by the staff at A.C. Moore that I should expect to receive some goodies, I had no idea I'd be coming home with so much stuff. Apparently seasoned convention attendees come prepared for "swag", the insider's term for the giveaways and free goodies that one receives at these conventions. I saw some people walking around with rolling luggage just for that purpose.

I received beautiful cardstock, inks, chalks, magazines, catalogs, stencils, cutting tools and more from companies like Fiskars, The Crafter's Workshop, Tsukineko, Dies Cuts With a View (DCWV) and others. Pictured here is just a small fraction of the treasures I brought home...so much that I was concerned about exceeding the weight limit on my luggage. (Side note: On the return trip home, I placed my carry-on bag on the luggage scale. It weighed 15 pounds and it only contained the magazines and catalogs I received. The rest of the goodies were in my sister's carry on and in our luggage.) Seriously, it took me four days just to put some of it away and I still have some things in my crafts room that are floating around waiting for a permanent storage place. All this does not take into account the goodies I received from A.C. Moore BEFORE attending CHA as part of my sweepstakes prize! Heaven knows what is going to happen when my big win...the E-Craft electronic cutter... arrives. I suppose I'll have to rent a storage room somewhere.

So what to do with all of this wonderful material and inspiration that I brought back from CHA Summer 2010? Start crafting, of course!! Look for my next post where I'll show pictures of some of the things I've been making.


Ballo ergo sum - Gitana, the Creative Diva Design team member for About Art Accents