Saturday, December 31, 2011

Another Year Gone By

(Click on any photo to see a larger image.)

Wow. It's hard to believe it's been over a month since my last post here. I've been keeping pretty busy at the senior citizen's center conducting craft classes and decorating the center for the holidays.

You can see at left some of what was done to prepare the center to bring in the holiday season in grand style. There used to be an old mirrored disco ball hanging from the ceiling that had seen better days so we took off all the mirrors and covered the ball to look like a giant combination tree ornament/mistletoe ball. JoAnne Biswakarma, the center director, is seen at left cutting and glueing the greenery to the ball to give it that mistletoe look. The main hall was decorated for Christmas in red and green while one end of the hall was decorated for Hanukkah in blue and silver. The members of the center love their holiday decorations and we typically leave them up straight through February, making some minor changes to accomodate Chinese New Year and Valentine's Day, two holidays that feature red as a prominent color theme. They come down at the end of February, giving way to Saint Patrick's Day green and the heralding of spring.

December saw me busy working at Christmas crafts for my senior ladies. My favorites are cards and ornaments so we made two of each. I was very fortunate to have received a phenomenal donation of crafting supplies from a fellow Freecycler who was downsizing her craft stash...22 boxes to be exact. That huge bonanza gave me nearly everything I needed to put together all of the  projects on this page. Even the tiny crocheted wreath for the Santa Claus card was part of those supplies. All I had to do was put everything together. It was wonderful.

The new year is upon us so there is no rest for this creative diva. I've got to come up with something to ring in the Chinese Year of the Dragon on January 23rd.

See you next year!


Ballo ergo sum
- Gitana, the Creative Diva

Sunday, November 6, 2011

Rubbermaid Bento - Before and After


(Click on any photo to view a larger image.)

As I mentioned in a previous post, I was notified by Rubbermaid that I was a finalist in a contest I entered on their website and as my prize I received a set of Rubbermaid's new organizational boxes called Bento. All I had to do to qualify for the first prize was organize an area of my home and send them a photo of it.

Much to my surprise, it was much more difficult for me to do this than I would have imagined. Because I had to photograph the final project, I was conscious of the fact that the Bento boxes had to be a prominent feature in the photo. This is where it became difficult. The boxes, as wonderful as they are, are not optimally sized for the kinds of things I needed to organize, namely my crafting area. The two smaller sizes worked out well enough but the two larger sizes were a bit more problematic. In order to work around this, I actually ended up doing an overhaul of my space, moving things from one side of the room to the other, rearranging stuff and actually throwing out a lot of things that had really outlived their usefulness to me. This was a great thing for me. In the process I was able to place those items that I use frequently within reach, consolidate some of my supplies so like items were together instead of scattered around the room, and in general make my work area more functional. It was something I had wanted to do for quite a while but kept putting it off. Being forced to do it was actually a good thing.

Here are before and after photos. Now that I see the difference, I realize just how scary my craft area looked. When my son saw the newly organized area, his reaction was "Wow!". Coming from him, that says a lot. What do you think? Please comment below and give me some feedback.

I will soon be posting my 'after' photo on the Rubbermaid website as per the conditions of the contest. Winner to be chosen based on votes received so I'll be posting the voting website here as soon as voting opens. I hope you will all choose to vote for me and help me win the $500 top prize. Thanks.

Ballo ergo sum
- Gitana, the Creative Diva

UPDATE: The votes are in and I placed in the top ten out of 50 finalists. My third prize winning included a prize package full of great new Rubbermaid products. So essentially I won a box of goodies, took a picture of what I did with it, then won another box of goodies. Not too shabby.

Friday, November 4, 2011

UPDATE: The Ladies Are Gonna Like This...


(Click on any photo to view a larger image.)

In a previous post, I posted photos of the necklace kits I was creating for my weekly crafting session with the ladies of Dorchester Senior Citizens Center in the Ditmas Park area of Brooklyn. As I predicted, the ladies really liked working on their necklaces. In fact, I had to turn some people away for lack of sufficient kits to accommodate them.

One of my favorite parts of crafting at the senior center is watching the faster crafters turn and help their slower neighbors. On several occasions I have seen one 95 year old woman turn to assist another 95 year old classmate. It is also gratifying to see young volunteers and nursing students working with the seniors.

Here are some photos from the necklace crafting class. Maybe in the faces of these beautiful people you can see why they make me smile.

Ballo ergo sum - Gitana, the Creative Diva

Thursday, November 3, 2011

The Ladies Are Gonna Like This...

(Click on photo to see a large image.)

In a departure from our usual paper based projects, this week my senior crafting group will be working on a lovely necklace to warm their necks during these chilly days. The beads used in this projects were all found at Materials for the Arts over several shopping trips. The pretty metal tube spacer beads were among the latest finds on the last trip I took there with the senior center director.

The necklaces are worked up in two different color schemes to appeal to different tastes: pink and black for bold contrast and orange and brown for a more seasonally appropriate palette. Since my seniors do not have any jewelry making skills, I created the dangles individually so all they have to do is string the beads in the prescribed pattern. That in itself will be a challenge with my strong willed women who may opt to string them any way they wish. We'll see what occurs. Come what may, they will be beautiful in their new finery. They always are.

NOTE: Go here to read the update to this article and see more photographs.

Ballo ergo sum
 - Gitana, the Creative Diva

Rubbermaid and Me


(Click on a photo to view a larger image.)

Some weeks ago I received an email from Rubbermaid introducing a new line of organization and storage boxes called Bento, inspired by the Japanese lunchbox of the same name. The email also announced a contest called "What would you Bento?" wherein entrants would submit a short essay explaining what they would organize if they had a set of Bento boxes. That was a no brainer. I'm an artist + I have a workshop = I have a mess. So I entered the contest, promptly forgot about it and moved on. Imagine my surprise when I received an email from Rubbermaid last week telling me I was one of 50 finalists in Phase I and my prize was a brand new set of Bento boxes. All I had to do was agree to participate in Phase II of the contest in which I actually had to organize an area of my home, photograph it and upload the photo to the contest website. The first prize winner gets $500 and is chosen by a professional organizer. The second and third place winners are chosen by popular vote.

Above right you can see what just a small section of my work area looks like. These shelves, located immediately next to my work table, contain many of the items I use on a constant basis so I'm always reaching for them, hence the topsy turvy look of it all. Below that you'll see a photo of the Bento boxes when they arrived at my home a few days after I received the email. As you can see, they are very pretty and contain flexible dividers inside to allow for some customization to suit specific storage needs. They also have reversible tops that can be used as lids or as storage trays. Now all I have to do is bring the boxes to the mountain of 'stuff' I've got and see if it will make a dent in taming the clutter. (FYI,  it does look messy but everything is in its place and I know where everything is. It's just such a motley assortment of different storage items that it looks a lot worse than it really is.)

I've already begun moving things around in an attempt to corral the chaos and it has really been a very good thing. In the process I have been able to jettison a lot of stuff that I no longer had any use for, thus freeing up some space. These Bento boxes will not be enough to hold everything I have in these shelves, to say nothing of the rest of the basement. (Yes, Virginia, I use up nearly an entire basement...both a blessing and a curse.) In any event, they will no doubt help make the place look somewhat more pulled together aesthetically. I'll post more photos once I've completed the reorganization and I'll be soliciting votes in an attempt to win a cash prize so stay tuned. Thanks.

Ballo ergo sum
- Gitana, the Creative Diva

Saturday, October 29, 2011

Creative Withdrawal Pangs

(Click on any photo to view a larger image.)

I have been so busy doing so many things for others that I really haven't taken the time to indulge in doing those crafty and creative things that I love to do for myself. This week, after I completed my weekly project for my ladies at the senior center (seen in the smaller photo below), I found myself longing to do something that allowed me to do exactly what I wanted without simplifying the process for the benefit of others. The sensation was a physical pang in the center of my chest that would not go away. It was urging me, compelling me to create something in that very moment.

It was already in the wee hours of the morning when this internal conversation was going on so whatever I did, it had to be quick, easy and satisfying. I decided to use stamps I had never used before, inks I haven't used in quite a while and create in a format I haven't used since the beginning of the year. The result was the simple ATC you see in the top photo. The small size (2-1/2 X 3-1/2 inches) made it a quick project and the duochromatic pallete meant I didn't have to think too much about color.

Although this is not one of my best pieces, I found it immensely satisfying on a number of fronts. It fulfilled my urge to create just for me, allowed me to experiment with new images and came together quickly. Most of all, I didn't think about it. I just let it flow. The knowledge that the result was for no one other than myself gave me the freedom to just let go and allow my hands to wander around my table, picking up this stamp, that ink pad, sponging this and edging that, covering the paper without a lot of effort. It felt good, very good, and it made me smile.

 Ballo ergo sum
- Gitana, the Creative Diva

Wednesday, October 12, 2011

Autumn's Approach


(Click on a photo to view a larger image.)

The dog days of summer are at an end and Autumn tosses her pretty head. At the Dorchester Senior Citizens Center we welcome the cooler days of autumn by crafting some beautiful all-occasion cards and a pretty hanging picture frame.

In a departure from our usual side opening cards, I designed a gatefold card that opens out to either side from the center. The Asian inspired designs are simplified versions of actual Asian motifs and rest on a background of handmade Asian papers. The inside of the card is watermark stamped in a bamboo pattern.

Pattern play was the order of the day with our black, white and one color card. In this case the contrasting color was a bright, peppery red that just popped off the page. The overall design, while simple, is given visual punch by the repetitive patterns.

The glory of autumn's colorful display is the inspiration for the Falling Autumn Leaves card. Tiny individual leaves punched in a variety of colors and patterns are arranged to look like the leaves of an autumn tree. You can see in the detail photo how the different colors and patterns work together to replicate the colorful trees of this season.

Less is more as evidenced in this very simple yet chic hanging picture frame. Visual interest is achieved with patterned paper, a gold beaded applique and a glossy black feather. Here is a simple frame that allows the photo to do all the talking while it quietly whispers in the background.

All of our crafts are on permanent display at the senior center, located at 1419 Dorchester Road in the Ditmas Park section of Brooklyn. For further information you can call them at 718-941-6700 or email the director, JoAnne Biswakarma, at dorchesterlife@optonline.net.

Ballo ergo sum
- Gitana, the Creative Diva

Friday, August 19, 2011

Special Cards for Special Family Members

(Click on any photo to see a larger image.)

I just returned from a week in Las Vegas, Nevada, where I attended my brother's wedding. Trust me, it had to be something as major as a family wedding to drag me out to the desert during the hottest month of the year. Anyway, my brother brought along his oldest daughter on this trip as a gift to her for her recent high school graduation. This meant, of course, that I had to make two cards: one for my brother and his new bride and another for my niece.

For some reason I found it easier to create the card for my niece and I had it completed a week in advance. It is a pocket card which features a small silver key hanging from a brad on the inner card and sparkling rhinestone embellishments on the front of the pocket. What you can't see (because I neglected to photograph it -- DUH!) is a tiny vellum envelope attached to the back of the inner card. It held money that had been folded origami-style into hearts.

My brother's card, on the other hand, was a last minute job done bleary-eyed on the night before my departure.  For the life of me, I was stumped as to what to create even though I started the process way ahead of time. After tossing around and rejecting ideas for days and nights, I finally opted for handmade paper in precious metal colors of gold and silver cut and arranged into rays on a background of navy blue cardstock. Wired gold ribbon was used to create a pouf that provided the background for glittery white fern leaves and gold pearl sprays. The large initial is cut from white glitter cardstock and adhered on dimensional foam for height. A lone white dove ties the elements together and conveniently covers the join of the sprays. The choice of colors was very deliberate: precious metals to symbolize prosperity and a long married life together, gold stars on a navy blue background to symbolize my brother's long tenure as a member of the US Navy and the Naval Reserve and, of course, white. It is a wedding card after all. In spite of the fact that the card was done in a  hurry, I was pleased at the way it turned out. I guess I work well under pressure. The bride and groom were also pleased enough that they have decided to frame the card and display it in their home.

Much love and happiness for many years to come.


Ballo ergo sum,
- Gitana, the Creative Diva
Creatively connecting people through art

Monday, July 18, 2011

Senior Crafting Continues...

(Click on any photo to view a large image.)

Summertime and the living is hectic! For some reason, just as everyone else is  slowing down to enjoy the hazy days of summer, my life seems to ramp up exponentially. No rest for this diva, that's for sure. I've been keeping busy keeping the members busy at the Dorchester Senior Citizens Center. Even with all the frenzy associated with working with a bunch of fourth graders and helping them create a display board for a school exhibit, I had to continue my weekly crafting sessions with the seniors. It is becoming increasingly difficult to come up with projects that are suitable for everyone's abilities. Thank goodness for the internet. If I couldn't search out new ideas, I don't know what I would do.

Whenever possible, I try to incorporate rubber stamping into our projects. I think it is good to give participants a measure of freedom in what they create even though the components are coming from a kit (one that I create). To that end, I came up with the medallion treat box pictured here. Participants got to choose a small rubber stamp from the center's collection and use it to create a repetitive design on the body of the box using either black or sepia ink. The box, as well as the medallion, was cut using a die cutter. The brown disk, procured from Materials for the Arts, was attached with a small decorative brad from my own stash and wound with household string. But what good is an empty treat box? No good I say, so once they finished them, I filled the boxes of all the participants with candy.


The best projects are those that are actually useful to the crafters. With that in mind I designed this memo pad box. Each box was cut from different patterned paper so no two were alike. In addition, the embellishments used to decorate the upper part of the box differed from kit to kit. I also cut out colored text weight paper to fit inside the boxes and glued them together like memo pads. I even provided them with a pencil to write their notes with.

A project I saw on Splitcoast Stampers website inspired the next project, a flower pot card with three dimensional flowers and a charm. I designed the  "pot" in graphics software, exported it and cut it with the eCraft electronic cutter, Flowers were punched and attached with  dimensional foam to give them depth. A coordinating ribbon wraps around the pot's "brim' and sports a silver charm that says "You are Loved". The back of the envelopes. overstocks found at Materials for the Arts, bore the name of a company, so we simply placed faux postage floral stickers over the name to cover it up in a coordinated manner.

Before we knew it, July was upon us, bringing with it a major holiday. To prepare the center for a summer celebration, we created Fourth of July signs that were then placed around center as decorations. The seniors love to see their work being displayed and appreciated.


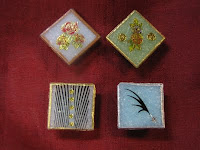
 In a break from papercrafting, I decided to try something a little different and a lot smaller. Among my Freecycle treasures I had some glass tiles and hundreds of tiny nail art decals, (the type that are used to decorate a woman's fingernails) and some small round magnets. I added some specialty glue and paint markers from my own supplies and BINGO!... instant refrigerator magnets. During this crafting session something unusual happened. As I mentioned, the project was small. Each tile was only 3/4 inch square and the decals were even smaller, and although it took me a matter of minutes to make a tile, I suspected the seniors would have more difficulty with the project because of its small size. They did, but instead of getting frustrated and giving up, they all concentrated harder until they mastered the technique of soaking and sliding the decals off the backer paper. While they worked, they became very quiet and focused on the task at hand, ultimately creating beautiful little works of art that they can stick to their refrigerators. Here you see a few examples of the magnets I made as prototypes for the project. I was truly impressed at some of the designs they came up with. We all had a great time.

On a semi-related note, there were several new crafters in the group that were taking my class for the very first time. Among them was the center's newest volunteer, Alan (sorry, never caught your last name) who you can see here holding the tile he created. I'd like to welcome Alan to the Dorchester Senior Center and thank him for participating in my craft class.

There's still lots of summer left and I've still got loads of crafting to get done. I'd getter get busy.


Ballo ergo sum
- Gitana, the Creative Diva

Thursday, June 16, 2011

And Finally...A Work of Art is Born.

 (Click on a photo to see a larger image.)

After all the crafting sessions were done, I was left with the task of bringing all the materials together into a cohesive display for the school's expo. Here's a photo of the completed display and, as you can tell, it's pretty impressive. The leaves, the flowers, the title board -- everything the students made with me-- have all been incorporated into the final design. The design follows the general outline I created graphically very closely but it was still not a piece of cake. The photos I took of the students at work with the seniors had to be reprinted at a smaller size in order for them to fit without overwhelming the display and to allow room for the needlework headbands and bracelets and some student writing samples. I was even able to incorporate some butterflies the students decorated. I had given them foam butterflies and a full color brochure containing images of Kenya's butterflies to use as a source of inspiration. You can see the butterflies in the four corners of the display as well as fluttering across a sunset sky and up across a wall.


The installation of the display took all day -- not because there was so much to do ( it was all done at home) --  but because I couldn't get the maintenance crew to spare five minutes and a ladder to drive two nails. I waited three and a half hours until finally the teacher's husband who had come to lend his support decided to take matters into his own hands and scared up two nails, a hammer and a ladder. It took five minutes to mount and three and a half hours to wait for the proper materials. There's gotta be a better way.


The expo is a large, annual event that involves the entire school and every student in it. I'll post photos of the expo in a future post.


Ballo ergo sum
- Gitana, the Creative Diva
Design team member for About Art Accents

Thursday, June 9, 2011

Crafting with Students Continues...

 (Click on photo to see a larger image.)

After the successful crafting event that took place between the PS 119 students and my crafters at the senior center a couple of weeks ago, JoAnne Biswakarma, the center director, and I visited the students in their classroom to continue working on the display materials. This time the groups were divided a little differently. The needlepointers continued working on their unfinished plastic canvas projects while I handled the rest of the class...nearly twenty 9 year olds...to complete the title board that would appear over the finished display. Actually we worked on two title boards so I would have enough work for all the children to participate. Because there were so many diverse parts to the creation of this board, I was able to have the kids participate in things that they liked to do or, as was the case at least a few times, not give them something that they didn't like to do. There was one young man who was determined not to have to cut anything with a scissor so I was able to have him file notches with a needle file into skewers that would eventually become spear handles .

These same children, who were so well behaved when at the senior center, were little hellions in their own environment. The boys were particularly rambunctious. I had my hands full keeping them occupied and on task but somehow I managed to complete everything I set out to accomplish within the time allotted. In spite of the noise and the running around, the end result was very pleasing. The kids managed to finish their respective tasks and bring it all together to complete some pretty impressive title boards.

Now that they have created all these wonderful items, it is up to me to bring them all together into a display that will make them proud. Although it isn't finished yet, the display is shaping up nicely. All the elements the students created...the flowers, the leaves, the title board...are coming together beautifully. The title board at the top is a representation of the flag of Kenya complete with stripes and Maasai shields. The shields and letters are popped up from the background, giving them a three dimensional look. Even the title board itself is raised away from the display board so it appears to float above it. The leaves and flowers are also three dimensional,  having been strategically folded to give them a more realistic look and  attached in such a way as to have parts of them stand away from the board. Now to add some photos, a little text, some other doohickeys and VOILA! One magnificent display coming up.


Ballo ergo sum
- Gitana, the Creative Diva
Design team member for About Art Accents

Friday, June 3, 2011

Intergenerational Crafting

As I mentioned in an earlier post, I was recently awarded a small grant to continue the work I have been doing at the senior center. One of the requirements of the grant is that the project must in someway positively impact the community. In my application proposal, I stated that I would arrange to have the work created by the seniors displayed at a local school as fulfillment of my community outreach requirement. After I was given the grant I began to think about how to get a school to turn over some display space for my senior projects. It was then that I realized that the best way to get a school to cooperate was to get its students involved in the crafting. Once there was a vested interest in displaying works created by its own students, I was sure I would be able to get some display space somewhere in a school.

As luck would have it, the universe conspired in my favor. Last year a group of elementary school students had visited the senior center so I contacted that teacher to see if she would once again be interested in having her students interact with the seniors. That's when I hit pay dirt. Not only was she interested but it turned out that her class was preparing to create display materials for a school-wide global studies expo in June. My original idea, which was simply to have seniors and school kids create some flowers together, grew into an interdisciplinary learning experience that directly tied into their global studies curriculum. The class was studying various aspects of Kenya which happens to be a large floral exporter . A little research revealed that chrysanthemums are among the most popular flowers exported from Kenya and, as it turns out, the flowers I had intended for the group to create looked like stylized chrysanthemums. I dug a little deeper and found some more Kenya-related facts that I could build upon for the project. On the day the students arrived, they split up among three areas to create flowers, tropical leaves and needlepoint work that imitated Maasai beadwork. The seniors who worked with the students helped them master the finer points of creating flowers while the other students worked on different projects. Good thing I had them to help out because I was jumping around to three different tables giving directions and taking photographs. The center director, JoAnne Biswakarma, was directing a fourth table of students engaged in the plastic canvas needlepoint.

Above you see a photo of the flowers and leaves the students were able to complete in the short time they were at the center. (Because of their age and to protect their privacy, I can't show you photos of the students themselves showing off their work.) I will soon visit the students in their classroom so they can complete the needlepoint and to work on more elements of the final display that will be on display the week of June 13th. I'll be sure to photograph and post photos of the completed display once it has been mounted.


Ballo ergo sum
- Gitana, the Creative Diva
Design team member for About Art Accents

Wednesday, May 18, 2011

The Hurrieder I Run, The Behinder I Get

I've been living life on the fast lane for at least a week now since I returned from my daughter's graduation in North Carolina. No sooner did the plane's wheels hit the tarmac than I hit the ground running and I haven't stopped running since, so much so that my Thursday afternoon senior citizen's crafting class was looming large and I didn't have a project ready for them. I couldn't show up without anything for my ladies especially since I had been absent the week before but I was so tired that my mind literally shut down. I couldn't come up with anything until the wee hours of Thursday morning when I pulled this blue and green rabbit out of my hat. I actually cut and pulled all the pieces of this card together in a couple of hours before I had to be at the center. The card opens like a matchbook with the front flap tucking into the scalloped turned-up edge at the bottom. I added a small heart charm on the bottom edge that is inscribed with the sentiment "Hand Made from the Heart". Overall this is probably one of the least inspired of anything I've made but the ladies didn't seem to mind at all. The bright colors and the charming touches of trim and tassel were enough to appeal to them. They are a very forgiving group.
That's me instructing a member
on project assembly.
Two of my wonderful senior crafters.
At least I got a jump start on this week's project. It's relatively simple but I think they will enjoy it. It is a small treat box featuring a medallion front and a string wrap closure. (When they're finished making the boxes, I'm going to fill them with some treats!) The pattern on the card stock was formed with a small rubber stamped image stamped multiple times. This will mark the group's first foray into rubber stamping and I have fingers and toes crossed that it will be successful. Up until now I have stamped the images that were used in any of our projects because we simply didn't have stamps and ink enough for everyone. The combination of my constant solicitation of donations on Facebook coupled with the small grant I received from the Department of Cultural Affairs has produced enough stamps and ink pads to accommodate everyone in my small group.


Ballo ergo sum
- Gitana, the Creative Diva
Design team member for About Art Accents