Thursday, June 16, 2011

And Finally...A Work of Art is Born.

 (Click on a photo to see a larger image.)

After all the crafting sessions were done, I was left with the task of bringing all the materials together into a cohesive display for the school's expo. Here's a photo of the completed display and, as you can tell, it's pretty impressive. The leaves, the flowers, the title board -- everything the students made with me-- have all been incorporated into the final design. The design follows the general outline I created graphically very closely but it was still not a piece of cake. The photos I took of the students at work with the seniors had to be reprinted at a smaller size in order for them to fit without overwhelming the display and to allow room for the needlework headbands and bracelets and some student writing samples. I was even able to incorporate some butterflies the students decorated. I had given them foam butterflies and a full color brochure containing images of Kenya's butterflies to use as a source of inspiration. You can see the butterflies in the four corners of the display as well as fluttering across a sunset sky and up across a wall.


The installation of the display took all day -- not because there was so much to do ( it was all done at home) --  but because I couldn't get the maintenance crew to spare five minutes and a ladder to drive two nails. I waited three and a half hours until finally the teacher's husband who had come to lend his support decided to take matters into his own hands and scared up two nails, a hammer and a ladder. It took five minutes to mount and three and a half hours to wait for the proper materials. There's gotta be a better way.


The expo is a large, annual event that involves the entire school and every student in it. I'll post photos of the expo in a future post.


Ballo ergo sum
- Gitana, the Creative Diva
Design team member for About Art Accents

Thursday, June 9, 2011

Crafting with Students Continues...

 (Click on photo to see a larger image.)

After the successful crafting event that took place between the PS 119 students and my crafters at the senior center a couple of weeks ago, JoAnne Biswakarma, the center director, and I visited the students in their classroom to continue working on the display materials. This time the groups were divided a little differently. The needlepointers continued working on their unfinished plastic canvas projects while I handled the rest of the class...nearly twenty 9 year olds...to complete the title board that would appear over the finished display. Actually we worked on two title boards so I would have enough work for all the children to participate. Because there were so many diverse parts to the creation of this board, I was able to have the kids participate in things that they liked to do or, as was the case at least a few times, not give them something that they didn't like to do. There was one young man who was determined not to have to cut anything with a scissor so I was able to have him file notches with a needle file into skewers that would eventually become spear handles .

These same children, who were so well behaved when at the senior center, were little hellions in their own environment. The boys were particularly rambunctious. I had my hands full keeping them occupied and on task but somehow I managed to complete everything I set out to accomplish within the time allotted. In spite of the noise and the running around, the end result was very pleasing. The kids managed to finish their respective tasks and bring it all together to complete some pretty impressive title boards.

Now that they have created all these wonderful items, it is up to me to bring them all together into a display that will make them proud. Although it isn't finished yet, the display is shaping up nicely. All the elements the students created...the flowers, the leaves, the title board...are coming together beautifully. The title board at the top is a representation of the flag of Kenya complete with stripes and Maasai shields. The shields and letters are popped up from the background, giving them a three dimensional look. Even the title board itself is raised away from the display board so it appears to float above it. The leaves and flowers are also three dimensional,  having been strategically folded to give them a more realistic look and  attached in such a way as to have parts of them stand away from the board. Now to add some photos, a little text, some other doohickeys and VOILA! One magnificent display coming up.


Ballo ergo sum
- Gitana, the Creative Diva
Design team member for About Art Accents

Friday, June 3, 2011

Intergenerational Crafting

As I mentioned in an earlier post, I was recently awarded a small grant to continue the work I have been doing at the senior center. One of the requirements of the grant is that the project must in someway positively impact the community. In my application proposal, I stated that I would arrange to have the work created by the seniors displayed at a local school as fulfillment of my community outreach requirement. After I was given the grant I began to think about how to get a school to turn over some display space for my senior projects. It was then that I realized that the best way to get a school to cooperate was to get its students involved in the crafting. Once there was a vested interest in displaying works created by its own students, I was sure I would be able to get some display space somewhere in a school.

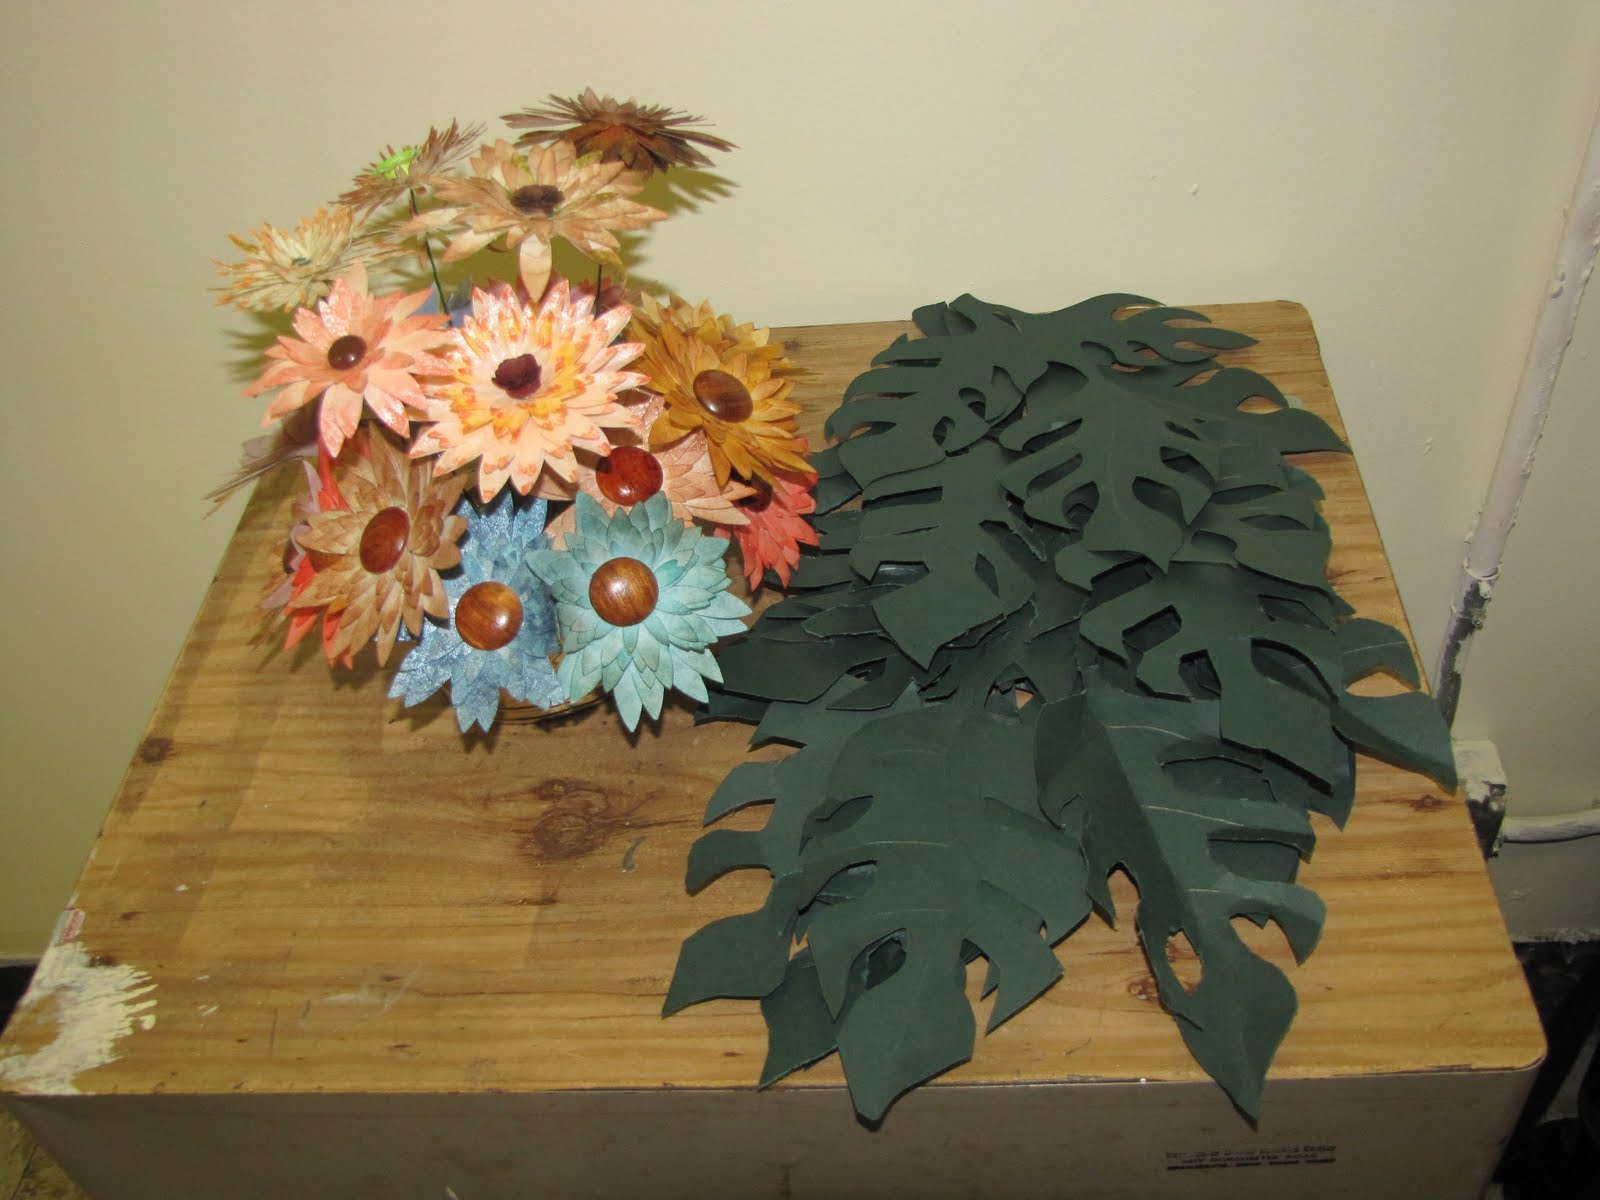
As luck would have it, the universe conspired in my favor. Last year a group of elementary school students had visited the senior center so I contacted that teacher to see if she would once again be interested in having her students interact with the seniors. That's when I hit pay dirt. Not only was she interested but it turned out that her class was preparing to create display materials for a school-wide global studies expo in June. My original idea, which was simply to have seniors and school kids create some flowers together, grew into an interdisciplinary learning experience that directly tied into their global studies curriculum. The class was studying various aspects of Kenya which happens to be a large floral exporter . A little research revealed that chrysanthemums are among the most popular flowers exported from Kenya and, as it turns out, the flowers I had intended for the group to create looked like stylized chrysanthemums. I dug a little deeper and found some more Kenya-related facts that I could build upon for the project. On the day the students arrived, they split up among three areas to create flowers, tropical leaves and needlepoint work that imitated Maasai beadwork. The seniors who worked with the students helped them master the finer points of creating flowers while the other students worked on different projects. Good thing I had them to help out because I was jumping around to three different tables giving directions and taking photographs. The center director, JoAnne Biswakarma, was directing a fourth table of students engaged in the plastic canvas needlepoint.

Above you see a photo of the flowers and leaves the students were able to complete in the short time they were at the center. (Because of their age and to protect their privacy, I can't show you photos of the students themselves showing off their work.) I will soon visit the students in their classroom so they can complete the needlepoint and to work on more elements of the final display that will be on display the week of June 13th. I'll be sure to photograph and post photos of the completed display once it has been mounted.


Ballo ergo sum
- Gitana, the Creative Diva
Design team member for About Art Accents

Wednesday, May 18, 2011

The Hurrieder I Run, The Behinder I Get

I've been living life on the fast lane for at least a week now since I returned from my daughter's graduation in North Carolina. No sooner did the plane's wheels hit the tarmac than I hit the ground running and I haven't stopped running since, so much so that my Thursday afternoon senior citizen's crafting class was looming large and I didn't have a project ready for them. I couldn't show up without anything for my ladies especially since I had been absent the week before but I was so tired that my mind literally shut down. I couldn't come up with anything until the wee hours of Thursday morning when I pulled this blue and green rabbit out of my hat. I actually cut and pulled all the pieces of this card together in a couple of hours before I had to be at the center. The card opens like a matchbook with the front flap tucking into the scalloped turned-up edge at the bottom. I added a small heart charm on the bottom edge that is inscribed with the sentiment "Hand Made from the Heart". Overall this is probably one of the least inspired of anything I've made but the ladies didn't seem to mind at all. The bright colors and the charming touches of trim and tassel were enough to appeal to them. They are a very forgiving group.
That's me instructing a member
on project assembly.
Two of my wonderful senior crafters.
At least I got a jump start on this week's project. It's relatively simple but I think they will enjoy it. It is a small treat box featuring a medallion front and a string wrap closure. (When they're finished making the boxes, I'm going to fill them with some treats!) The pattern on the card stock was formed with a small rubber stamped image stamped multiple times. This will mark the group's first foray into rubber stamping and I have fingers and toes crossed that it will be successful. Up until now I have stamped the images that were used in any of our projects because we simply didn't have stamps and ink enough for everyone. The combination of my constant solicitation of donations on Facebook coupled with the small grant I received from the Department of Cultural Affairs has produced enough stamps and ink pads to accommodate everyone in my small group.


Ballo ergo sum
- Gitana, the Creative Diva
Design team member for About Art Accents

Saturday, May 14, 2011

Graduation Bear Hugs

(Please click on photo to see a larger image.)

Last year my youngest daughter graduated from high school and moved to North Carolina to attend college with her older sister. This year my older daughter has completed her requirements for the Associate of Fine Arts degree and will graduate. I decided to commemorate both graduations with customized teddy bears wearing caps and tassels that match those of their respective schools. Each one holds a "diploma" emblazoned with the graduate's name, school logo, class and date of graduation. These bears are adorable, if I may say so myself, and I'm sure my daughters will think so, too.

The mortarboard caps are created of cardstock and are carefully put together to avoid unsightly seams. The tassels are made with either crochet cotton or embroidery floss and is held in place with a mini brad painted to match the cap.  The diplomas were created in a page layout program in a small size just right for these bears that sit about four inches high without the hat.

Congratulations to Ava and Angel. I'm so proud of you both.

Ballo ergo sum
- Gitana, the Creative Diva
Design team member for About Art Accents

Saturday, April 30, 2011

Need a quickie card? RTU's to the rescue

(Please click on any photo to see a larger image.)

Okay, so my son tells me he is attending a two year old's birthday party but he didn't have time to buy a card or a gift. The two year old's father is a friend of his and was really pushing for a gift of some sort (just a little presumptuous on his part but I digress). I, who have absolutely NOTHING to do, decided I would make a quickie card. What? Me? A quickie card? Not a chance. I'm the one who spends fifteen minutes deliberating the placement of a decorative paper fastener. There was no way I was going to design a quickie card from scratch so I did the only thing I could do under the circumstances...I went straight to my RTU stash.

RTU stands for Ready To Use. It is my self-defined repository of all those odds and ends left over from other projects I had worked on, creative experiments I had tinkered with...just about anything that I couldn't bear to part with because I thought it would come in handy for a card someday. Sure enough, when I scrounged around in the depths of my creative detritus I found plenty of stuff with which to make a card sure to tickle any two year old girl's heart. In my card drawer I found the dark pink base card  with the pretty punched edge. My paper stash yielded the embossed Happy Birthday layer in pink and orange. The rosette was literally sitting on my table top for weeks, the remains of my first attempts at making rosettes. Fortunately it, too, had a punched edge. The large butterfly and the fern leaf were all leftovers from experimenting with my eCraft electronic cutter. The smaller butterflies had been punched out of scrap paper last year and had been fluttering around in my drawer ever since just waiting for me to notice them. Absolutely everything you see in the photo was ready and waiting for me to bring them all together. The inside of the card, which I neglected to photograph, had the sentiment "Make a Wish" stamped on a tag that also came from my RTU stash. This card only took me about half an hour and most of that time was spent in pulling together all the various pieces of this artistic puzzle and adding a little bling on the large butterfly. (Those rhinestones are applied by hand one by one.)

So I have learned that a severe shortage of time and limited supplies with which to work can spark the most creative ideas. I guess I'll have to dive into my craft drawers more often. Who knows what I might come up with?

Ballo ergo sum
- Gitana, the Creative Diva
Design team member for About Art Accents

Tea Time Birthday Card

(Please click on any photo to see a larger image.)

My husband made an unusual request of me last week. He asked me to create a birthday card for his employer. This first-of-its-kind request on his part took me off guard and presented me with a challenge. I now had to create a card that was suitable for a business relationship but personal enough to avoid appearing obligatory.

The birthday girl's favorite color is red (mine, too!) and she loves tea. I came up with this simple easel card layout featuring a stamp from About Art Accents Plate 244B - Tea Pot and Covered Tea Cup on a Tray. The bold red color accents the patterned washi paper. Gold edging gilds all curved edges and the intricate floral design on the teapot and cup are embossed with holographic embossing powder for a little extra bling. The kanji symbol in the lower right corner is the Chinese symbol for tea. The unique fold of this card allows it to stand like a painting on an easel so the recipient can display and view it.

My husband told me his boss loved the card and had made some noises about contracting me to create some cards or invitations for her. Who knows? Maybe I've got another client in the making.

Ballo ergo sum
- Gitana, the Creative Diva
Design team member for About Art Accents
Busy Time at the Senior Center

(Please click on any photo to see a larger image.)


As I mentioned in a previous post, the celebration of the spring season has begun at the Dorchester Senior Citizens Center have been concentrating on craft projects that incorporate a flower motif. Photos you see  here show some of the work we have done in recent weeks. During two craft sessions I had the ladies create beautiful three dimensional flowers on stems for the purpose of using them to decorate the main activity/dining room of the center. Using foam core boards and wrapping paper, I made a makeshift window box and arranged the flowers inside of it to make it appear as if they were growing out of the box. This box was then mounted on the soffit of the main room in between the floral panels I made several weeks ago.
All around the perimeter of the room, lights and paper lanterns in shades of pink, orange and white were hung, giving the room a very bright and colorful appearance, just the thing to shake off the last of winter's cold doldrums. Because I am only at the center one afternoon a week, it has taken me several weeks to get all these elements in place but it is coming together very nicely. The room feels brighter already.
Many thanks must be given to Materials for the Arts,  (MFTA) a division of the NYC Department of Cultural Affairs. This organization is responsible  for receiving donated materials from a variety of donors and making them available for art organizations and non-profit entities free of charge. Many of the materials used for the projects pictured on this page came from MFTA. The fabric paper used in making the flower petals, the foam core boards used to make the flower box, the tassel on the little purse card as well as the baby buttons used in the flower centers all came from materials for the arts. Even the main image and sentiment on the Victorian Rose card came from MFTA, taken from a brochure advertising different types of paper. Take a closer look at that Victorian card. Do you see the small gold buckle on the left of the satin ribbon? It's actually bra hardware - the kind used to make an adjustable strap. It also came from MFTA as do most of the envelopes used for all the cards I make with the ladies. If you are or know of a NYC-based organization that might be interested in accessing this great resource, just follow the link at the beginning of this paragraph to go directly to the MFTA website.


Ballo ergo sum
- Gitana, the Creative Diva
Design team member for About Art Accents

Thursday, April 14, 2011

Celebrating A Life Together

(Click on any photo to view a larger image.)

My sister Sue and brother-in-law Todd recently celebrated their 26th wedding anniversary and the event was marked with a family dinner hosted by my parents at their home. It was a simple affair to mark a grand achievement, one that I thought deserved a souvenir to commemorate the special occasion so I decided to create something that would be a lasting reminder of the day they got married. To that end I created  coordinating corsages for the two of them. (Oh, I know that men aren't "supposed" to wear corsages but what is a boutonniere if not a very small corsage?)

The corsages are created with a mix of miniature roses I made myself and manufactured elements in a gold and white color scheme. Her corsage features a small narrow ribbon bow imprinted with the words "Mr. and Mrs." and a white dove perched on the side of the golden bow. His smaller corsage features two golden rings affixed on the white plume just above the roses.

I also made corsages for my parents, the host and hostess. My mother loves all things green so her little roses are pale green with matching ribbon bows. My father's corsage is blue and white.
Wearing their anniversary flowers.

Seems I haven't stopped making paper flowers for a year now, starting with that massive floral project I did for my daughter's graduating class in 2010. Funny thing is that the more I make them, the more I like making them. I guess there are more flowers in my future for sure.


Ballo ergo sum
- Gitana, the Creative Diva
Design team member for About Art Accents

Sunday, April 3, 2011

Bloom or Bust: The Celebration of Spring Begins

Stylized hydrangeas
(Click on any photo to see a larger image.)

This has been a rather productive weekend for me. And well it should. After all, I sequestered myself in my basement workroom on Saturday for 15 hours, breaking only long enough to eat (such a bad habit), go to the bathroom (another time waster) and play the occasional computer game to take a break (time well spent).

 For this year I have made "light", both as a relative measurement of weight as well as an element of energy, my theme. In a previous post, I mentioned how my first senior craft project of the year was intended to start the new year off with light. If you have read any of my other blogs, you know I'm a gardener and a lover of nature. I love the advent of spring with its promise of warmer weather and its beautiful array of colorful flora and fauna. In my recent series of projects I have incorporated both light and nature through images of flowers and butterflies. Both are light in terms of weight, both are colorful, color being the chromatic expression of light energy, and both represent beautiful aspects of nature. This kind of work puts me completely in my element.

Detail of Floral Border Panels

One of the things I do at the Dorchester Senior Citizens Center where I volunteer is to seasonally decorate the main activity room.
This weekend I decided to create flowers...lots of them...for the purpose of decorating the center for spring. I was inspired by a recent purchase of craft foam flowers intended for a young child's craft project to create some colorful border panels to be placed along one of the center's walls above eye level.  As I was putting the flowers together as intended by the manufacturer, I realized there was so much more that I could do to make them more interesting so I colored, scored, folded, and glued. The more I embellished, the more invested I became in the project and the more pleased I was with what was taking shape. Here you can see some photos of the four border panels I completed this weekend as well as some stylized hydrangea blossoms that were running around in my head, begging to be created.

No post concerning the senior center would be complete without some pictures of my lovely ladies. Here you see them showing off the flowers they made during a recent crafting session. Just look at the beautiful bouquet they created. Those flowers are almost as pretty as the women who crafted them.

Ballo ergo sum
- Gitana, the Creative Diva
Design team member for About Art Accents